Playback Configuration Panel
When the Playback Configuration Panel is selected, the system will enter Digital Video Recorder (DVR) mode for video playback. The system will remain in playback mode until the “Exit DVR” button on the DVR Control Panel is pressed. This allows you to switch to the Video and Motion tabs to adjust the video settings of the recorded video – a very useful feature to enhance the video to bring out detail that may be difficult to see.
DVR Control Panel
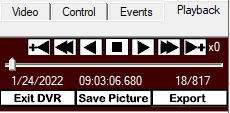
The DVR Control Panel allows you to Play, Stop, Pause, Fast Forward, Rewind, and Step through video during playback. These controls function similarly to a DVD player’s controls.
The slider bar underneath the controls shows the position in seconds within the minute. Clicking and moving it will allow you to move rapidly through the video.
Pressing this button will save the current video frame to a JPEG file on disk. This is useful if you need to save or send an image via email or other means. If the video frame has been digitally enhanced, the enhanced image will be saved.
- Create AVI/ASF File (.avi/.asf)”: These files are typically best used when exporting a few short clips. They can be played on media players such as Windows Media Player. They also can be sent via email. ASF/AVI are traditional video file formats, if you would like the most compatability for video players this is the option to choose
- “Create VCA File (.vca)”: The VCA format is ViewCommander’s video format. It preserves the original image integrity, and incorporates timestamp, digital fingerprint, and other video information. The ViewCommander player must be downloaded separately to playback this file
- “Create Self Playing VC File (.exe)”: The EXE is the same as the VCA format except it comes in a fully packaged player. You can send this export to anyone with a Windows computer and it will playback without the need to download the player
- “Folder Export”: The folder export is a raw copy of the video files as they were saved. This copies video and saves the original format and structure as it was saved on disk. Typically this is used for larger exports (hours/days long video clips).
Select a start time of the video to save. This value will be added to the ‘start time’.
Select the end time of the video to save. The end time cannot go past midnight of any day.
Multiple camera export. For a time range, choose one or more cameras to export the same time range.
Check this option to rotate the video 180 degrees.
Checking this option will overlay the source and/or camera name in the exported video.
Checking this option will overlay the date and timestamp of the video in the recorded video.
Press this button to begin exporting video. You will be able to choose a filename and path to save the exported video.

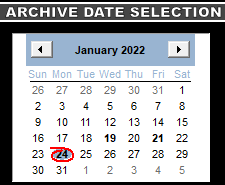
Date Calendar
The Date Calendar will highlight the dates when video was recorded. The dates will be in boldface, making them easy to select. Click on a date to select video recorded on that day. A listing of the hours video was recorded will be displayed in the Hour Listing box.
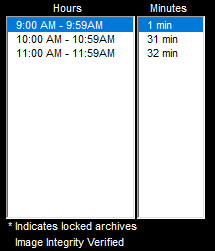
Hour / Minute / Integrity Listing
When a date is selected, a listing of all hours that video was recorded will be displayed in this box. Clicking on a listed hour will produce a minute listing in the Minute Listing box.
This displays a list of minutes video was recorded for the date and hour selected. Select a minute from this listing and press the “Play” button on the DVR Control Panel to view the archived video.
A message will be displayed confirming whether or not the video has been altered. The message “Image Integrity Not Verified” means the video has either been modified by an external program, or no fingerprint information has been saved with the video. A confirmation message “Image Integrity Verified” will be displayed if the image and timestamp match the digital fingerprint saved when the video was recorded.
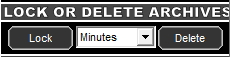
Lock or Delete archives
Pressing the Lock button will lock video for the Day, Hour, or Minute selected, depending on what option is selected in the pull-down menu adjacent to this button. Locked video cannot be deleted unless it is unlocked.
Pressing the Delete button will delete video for the Day, Hour, or Minute selected, depending on what option is selected in the pull-down menu adjacent to this button. Locked video cannot be deleted until it is unlocked.
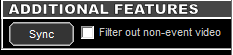
Additional Features
Checking this option will display video only at the times which an event occurred.