Video Configuration panel
The Video Configuration Panel allows you to adjust video settings, set recording options, and control PTZ functions.
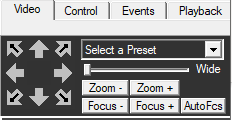
Embedded Mini Control panel
The reduced size control panel is a convenient way to control PTZ video cameras without opening a separate control panel.
Depending on your camera model your PTZ control may look different.
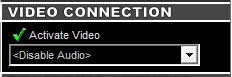
Video Connection
Checking this option will establish a network connection between ViewCommander and the camera to obtain a live video stream.
Choosing “Enable Audio” will establish a network connection between ViewCommander and the camera to obtain a live audio stream.
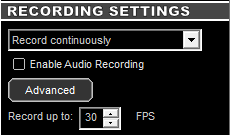
Recording Settings
Check this option to allow audio to be saved to disk for later playback.
Select this option to continuously record video (as opposed to saving video only on motion detected events). Adjust the Frames per Second (FPS) value to record video at the desired frame rate. Lower frame rates use less disk space.
Note: If the incoming video frame rate is lower than the frame rate specified in this option, then the video will be saved at the incoming frame rate.
Selecting the “Record Only Events” button will save video only when events are triggered, provided the event properties are set to record video (see “Event Configuration Panel” post for more information ). Events can include motion, I/O, or other detected events. When an event is detected, it will be saved at the incoming frame rate.
Select this option to set a schedule of when to allow recording of video.
If you do not have a schedule already set ViewCommander will ask you to set one. Click “Set Schedule” to set up an individual schedule for this camera.
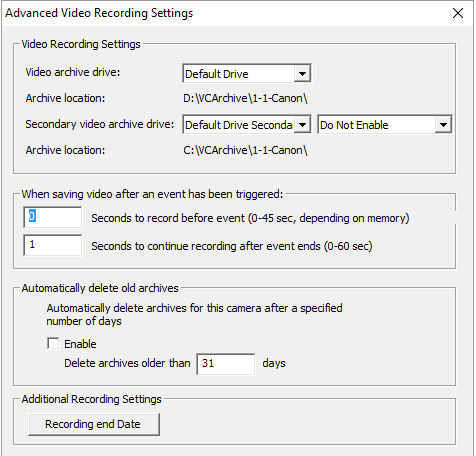
Advanced RecoRding
This option allows for advanced video recording settings.
Select a drive to save the video. If ‘Default Drive’ is selected, then video will be saved to the drive specified in the System Settings. To save to a network drive, the network drive must be mapped to a drive letter. The full UNC path will be displayed below after the drive letter is selected. In the Professional Plus model or higher, you can select a secondary failover drive to record to if the primary drive is full or offline. In the Professional Advanced model, you can record to both drives simultaneously.
Checking this option will save all the video frames in memory to disk when an event is triggered. ViewCommander will keep frames in memory for the specified time period. The seconds specified in the “Seconds to Continue” box will determine how long to record video once the event has stopped.
Checking this option will delete archives older than the days specified. Archives are automatically deleted every night at midnight, and are also deleted when the software starts. Video that is locked will not be deleted.
Video Settings
Adjusts the brightness of the video.
Adjusts the contrast of the video.
This video property allows light levels in the video to be equalized, and makes objects easier to see in darkened images.
Grayscale converts a color image to a black & white image.
Softening the video will reduce visual noise and artifacts.
This feature will further reduce noise and bring out detail in non-moving objects within the video.
This feature will brighten and enhance detail in non-moving objects in dark video.
Selecting this option will stabilize the video when the camera is shaking or swaying. This is useful if the camera is located in an outdoor location and high winds are causing the camera to move or vibrate.
Selecting this option returns all values to their default settings.
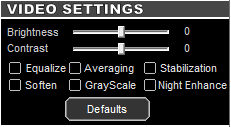
The video enhancement settings allow for the enhancement of the video stream in real-time, as well as in playback mode. In order to maintain the original image integrity of the image that was received from the camera, these video enhancements are applied after the video is received and recorded.
Statistics
This section displays usage statistics for the video feed. This is useful to see how much or how many network resources the video is utilizing. The incoming video dimensions are also displayed.
Additional Settings
Some cameras have the capability to store preset positions for easy navigation. Press the ‘Select the Update Preset’ button to download the presets into the control panel’s preset box.
This setting is one step in allowing individual users to get to the camera remotely. Here you will be able to select individual users or groups who you would like to be able to access this camera remotely. See the Remote Access and Security Settings page for more information.
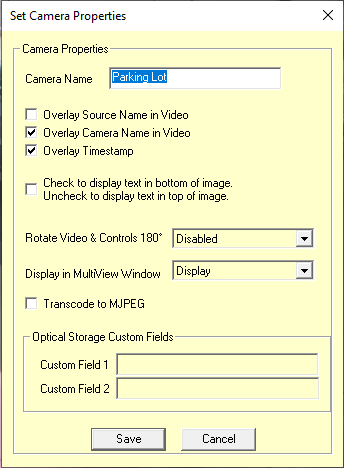
These settings allow for different video options such as name overlay and rotating the video.
This option allows:
- Camera Name – Enter an easy reference name for the camera.
- Overlay Source Name in Video – checking this will overlay the video source Easy Reference Name in the live video.
- Overlay Camera Name in Video – checking this will overlay the camera name in the live video.
- Overlay Timestamp – checking this will overlay the current time in the live video.
- Display text in bottom of screen – Checking the option to place text at the top or bottom of the screen.
- Rotate Video and Controls 180 degrees – Select an option to rotate ‘video’, ‘control’, or ‘video & control’ 180 degrees.
- Display in MultiView Window – Choosing whether or not to display the video stream in the MultiView window. For systems with multiple remote windows, you will be able to choose which window number to display the video in.