Adding a Camera
To watch a Video Tutorial Click HERE

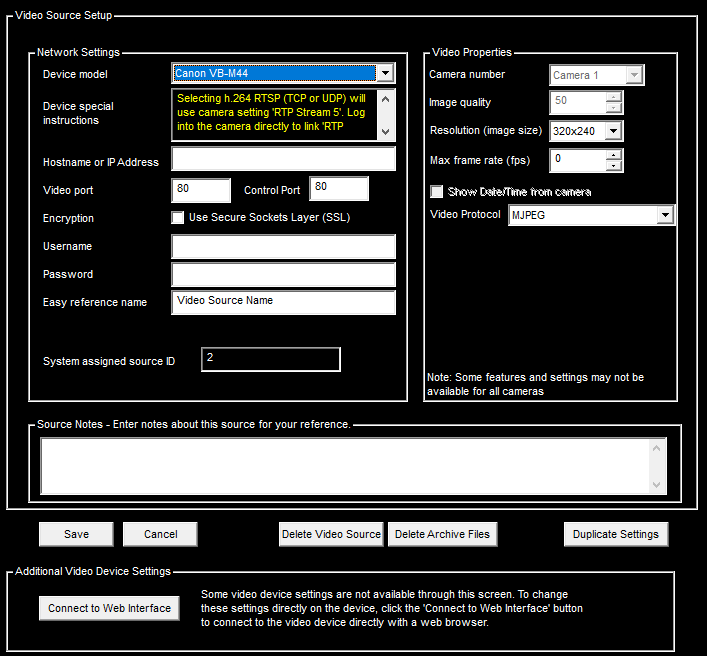
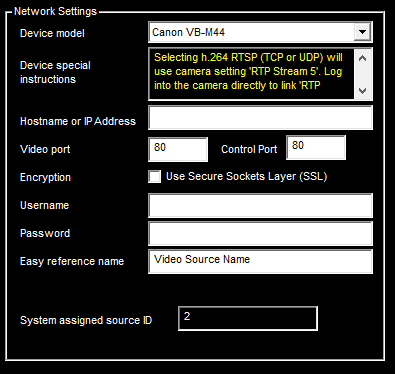
Network Settings
Device Model is the model of the camera or video encoder you will be adding.
Under the device model you will see “device special instructions”. These are tips that we provide for some cameras to assist in connecting to the camera.
This is the network address the system will use to connect to the camera. You can also enter a hostname, as well as a dynamic hostname if you set up your camera to use a DDNS, or Dynamic DNS address.
Video port and control port are typically the same port numbers, the default port number set on most cameras is usually 80. However you may have changed this if your camera is on a remote connection behind a router or firewall. If you are using RTSP, for example, you will need to change the video port to the camera’s RTSP port, usually port 554 by default.
If your camera allows it, you can check off “encryption or Sockets Layer SSL” . This will create an encrypted video stream between the camera and ViewCommander.
This is the same username and password that you use to log into the camera directly with a web browser.
This Easy reference Name option allows you to name your camera to a name that describes the camera. For example: parking lot, outside, street cam, etc.
This is a number assigned by ViewCommander. It is used by the system for functions including storage and web access. This value cannot be changed.
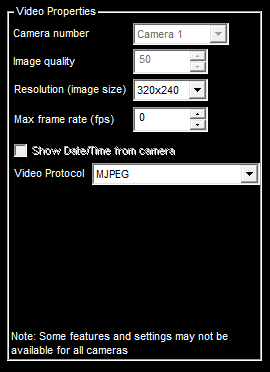
Video Properties
NOTE: Not all cameras will have the same options as below. The options depend on your camera’s capabilities. If an item is grayed out, it means this value cannot be set from ViewCommander. However, you may be able to log into the camera directly and change these settings.
References the video feed on the camera or encoder that you want to view. It is mainly used for video encoders that have two or more video feeds. For most cameras, this will be grayed out. If connecting to a video feed from another ViewCommander system, this number will correspond with the source ID on the remote ViewCommander system.
For cameras that allow it, ViewCommander can request the video with a specific quality, or compression, value. Video with higher quality will allow you to see more detail, but will use more bandwidth to transmit as well as more disk space when saving.
Any number between 0 and 100 can be inputted here. We typically see values of 50 to 75.
Lower resolutions will use less bandwidth and disk space, but will result in images with less detail. Higher resolutions will allow for more detail in the image, but will use more bandwidth, use more diskspace, and may reduce the video frame rate if bandwidth is constrained.
If you notice that the video in ViewCommander appears pixelated, it is the result of a lower resolution being stretched to fit the ViewCommander screen. You may want to increase the resolution if you desire.
You can set the maximum frame rate at which you want the camera to send video.. Any number between 0 and 30 is acceptable. The default value is 0 which means it will look to the default frame rate that is set on the camera or video server. Set the value to 0 to get the maximum frame rate possible.
Checking ‘Show Date/Time’ for cameras that allow it will tell the camera to embed a timestamp in the video image. If you choose this, be sure your camera is set to the correct time, or the ViewCommander timestamp will be different than the camera’s timestamp in the video. To set the timestamp on the camera, refer to the instructions that came with your camera. The time on the camera can usually be set through the camera’s web interface.
There are two supported video protocols: MJPEG and H264.
MJPEG allows for reliable and consistent video but may use more bandwidth.
H264 compresses video more efficiently, but may not be the best choice where the bandwidth can vary widely – such as some cellular connections. We generally recommend using TCP connections with H.264.
If unsure which video protocol to use, we recommend starting with MJPEG.
Connect to Web Interface

Some video cameras and video encoders allow you to adjust additional settings through the device’s web-based interface. Refer to your device manual on how to adjust these settings.
NOTE: If you are NOT able to connect your camera to ViewCommander please see our Troubleshooting tips on adding a camera by clicking HERE