Setting up a Recording
**Click HERE for a video tutorial
1. Set the default archive location on the computer’s storage drive for where you would like to save your recordings:
System Settings–> Archive Tab
NOTE: That these settings are global and will apply to all cameras. Once set, you should not have to go to this screen unless there are default settings that you need to change.
2. Setting up your cameras to record:
You will find all your Recording options here in the “Recording Settings” section. This is where you can select each cameras recording mode. From the drop-down box there are four options.
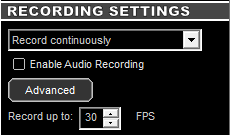
Video for this camera will not be recorded.
This mode will record all incoming video 24-7. You can see the system is recording by looking at the recording icon at the top right corner. If it is a filled in circle this means it is recording. It will save video at the frame rate that you specify. If the incoming frame rate is slower than the specified recording frame rate, then video will only record at the incoming frame rate. This frame rate specification applies only to MJPEG video. Due to the nature of H.264, all frames must be recorded.
When this option is chosen, you will need to set up a recording schedule. If a schedule has not been set, then a popup will appear telling you a schedule needs to be set. If a schedule is not set, no video will be recorded. Please see the “Master Schedule” page for more information on this.
You would choose this option if you want to record video only when an event is triggered, such as motion detection. If this is clicked and there are no events set up, a warning will appear. You will need to go to the Events section of the configuration panel and set up at least one or more events that trigger recordings when an event is encountered.
Enable Audio Recording
If your camera supports audio, ViewCommander can record audio too. To enable audio recording, simply check the “enable audio recording” checkbox. You must already have audio enabled for this camera.
Advanced Settings
If “Default” drive is selected, then video will be saved to the drive specified in the Systems Settings. Say for example you want to save this camera to a different drive letter, such as a USB drive that you are going to use for this one camera. Here is where you will override the default drive, and choose the specific drive location.
In the ProPlus model or higher, you can select a secondary failover drive to record to if the primary drive is full or offline. You can also record to two drives simultaneously if you are using the ProAdvanced model.
Under “saving a video when an event is triggered” you have the option to choose how soon you would like the system to start and end a recording when an event is triggered. The first option lets you save video before the event was detected.
NOTE: The longer you set this value, the more system memory ViewCommander will consume.
The second option sets how long to record video when an event is no longer detected.
Under the section “Automatically delete old archives” you can specify the number of days you want to save archives for before deleting automatically.
NOTE: Please be certain here if selecting to delete archived files, as files will be permanently deleted after this amount of days.
Under “additional recording settings” you can choose to have a recording end date. Simply click on the button to choose the date.